Is your Brother GTX struggling with white ink drop-outs or persistent banding? You are not alone. Recently, Winnerjet successfully helped a client overcome these exact issues that had brought her production to a complete standstill.
White ink problems are more than just a waste of ink and garments; they are a massive blow to your operational efficiency. To help operators break free from these frustrations, we have distilled Winnerjet’s years of R&D in printing consumables into this deep-dive troubleshooting guide. Through a real-world case study, see how we pinpointed the root cause and restored perfect print quality, bringing a Brother GTX back to life.
Why Does the Brother GTX Experience Ink Drop-outs and Banding?
Ink starvation and banding are rarely accidental. They are usually caused by a mix of physical and chemical factors. For the Brother GTX, or any DTG equipment, common culprits include:
1、Excessive Air in the Ink Lines: This is the most overlooked cause. If the ink path isn’t perfectly sealed or if ink pouches are replaced improperly, air enters the lines. Because air is compressible, it disrupts the continuous flow of ink, leading to “skipping” or random drop-outs during printing.
2、Printhead Aging or Sub-optimal Condition: Over time, the performance of the internal piezoelectric crystals may degrade, or the nozzle surface may become damaged. Once a printhead nears the end of its lifespan, the force and precision of ink ejection drop significantly, manifesting as persistent fine lines.
3、Lack of Long-term Deep Maintenance: The sedimentation of Titanium Dioxide in white ink is a 24/7 process. Relying solely on the machine’s automated maintenance while neglecting manual cleaning (such as wiping the blades or moistening the cap top) allows dried ink residue to clog the nozzles, creating a stubborn physical barrier.
4、Physical Contact Contamination: During printing, the printhead may accidentally brush against linty fabric or touch wet pre-treatment solution. Upon contact, the pre-treatment and white ink undergo a rapid chemical reaction, forming a gel-like substance on the nozzle plate that causes severe clogging.
During our in-depth consultation with this client, we asked what recovery steps had already been taken. Her feedback was filled with frustration—a nightmare familiar to many Brother GTX users:
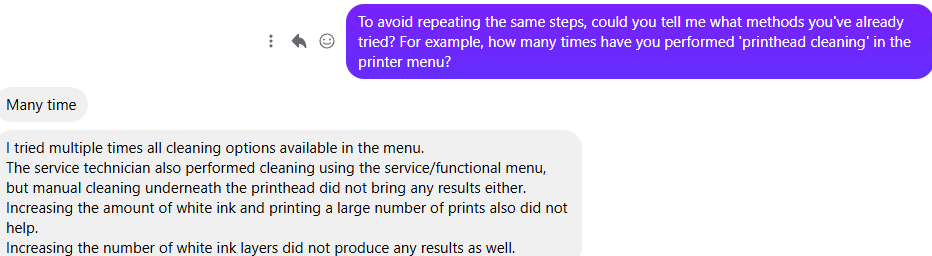
This reveals a harsh truth: blind “aggressive” cleaning and excessive printing often fail to solve the problem and may actually increase the strain on the printhead. When built-in automated programs and standard manual wipes fail, traditional repair logic usually leads to one final destination: replacing the expensive printhead. This was exactly why the client reached out to us:

The Critical Decision: Should I Clean or Replace the Printhead?
Facing a replacement bill of several thousand dollars is heartbreaking for any business owner. However, as an established technical supplier, Winnerjet is here to tell you: do not issue a “death sentence” for your printhead just yet.
In many cases, technicians recommend a replacement because it is the “easiest” fix for them, but it is the “most expensive” fix for you. Just before this client was ready to pay for a new head and give up on her current one, Winnerjet stepped in. We realized that if “brute force” physical cleaning isn’t working, we must address the chemical balance and ink line pressure. The Brother GTX printhead is actually quite durable; with the right scientific approach, most can be saved.
Before paying that expensive bill, we recommend trying the Winnerjet “Three-Step Recovery Method”:
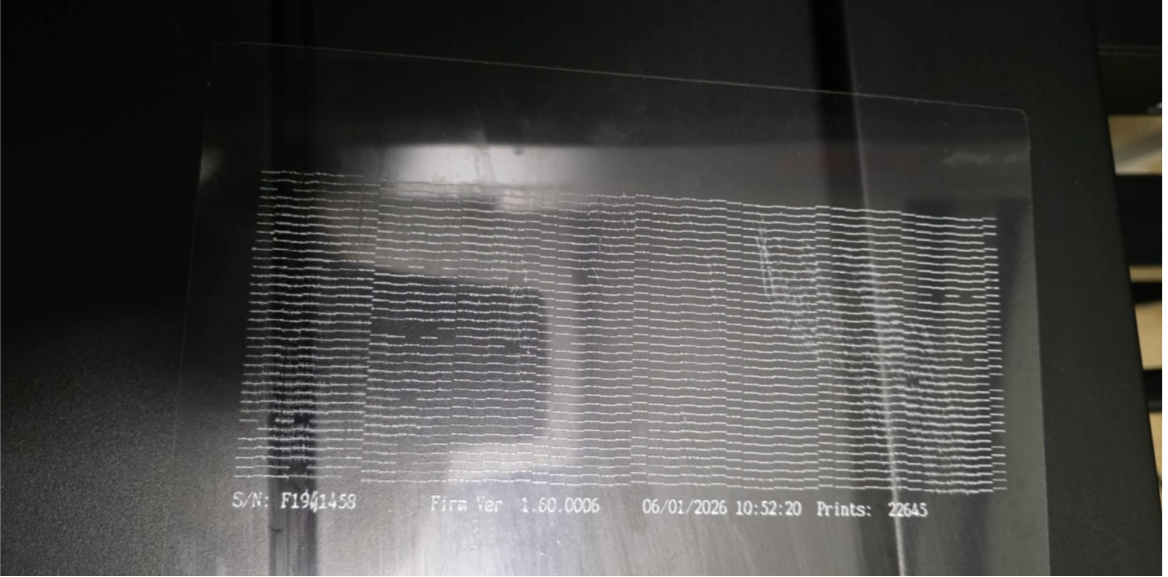
- Diagnostic Logic (Nozzle Check): Closely examine your nozzle check pattern. If the missing lines stay in the exact same position after multiple cleanings, it is a severe physical clog. However, if the gaps shift or move, that is actually a good sign—it means the printhead isn’t broken; you likely have air in the system or uneven pressure.
- The Deep “Soak” Method: Don’t just rely on automated cleanings, which waste a lot of ink. Use Winnerjet Professional Printhead Cleaning Solution to soak the cap top, then park the head over it for a 12 to 24-hour “wet soak.” This chemical penetration effectively softens and dissolves dried Titanium Dioxide particles in a way that automated cycles cannot.
- Eliminate Ink Path Interference: Look beyond the printhead. Check your white ink filters and dampers. Often, a head stops firing not because it is damaged, but because the dampers are choked with sediment, leading to “false failure” caused by insufficient ink flow.
The Winnerjet Professional Solution
Seeing the client’s despair after “all cleanings failed,” our technical team made a different call: if the printhead can still fire some lines, the nozzles aren’t permanently sealed. The real culprit was likely trapped air or a failed Damper.
We guided the client through the following precision steps to successfully save the “condemned” printhead:
Core Logic: Manual Air Bleeding & Damper Refresh
Expert Tip: Before starting, always power off the machine and unplug it to ensure safety.
- Open the Maintenance Access: Open the maintenance cover on the right side of the machine.
- Protection: Place a lint-free cloth under the access area. White ink is highly adhesive; you must prevent it from dripping onto precision circuits or mechanical parts.
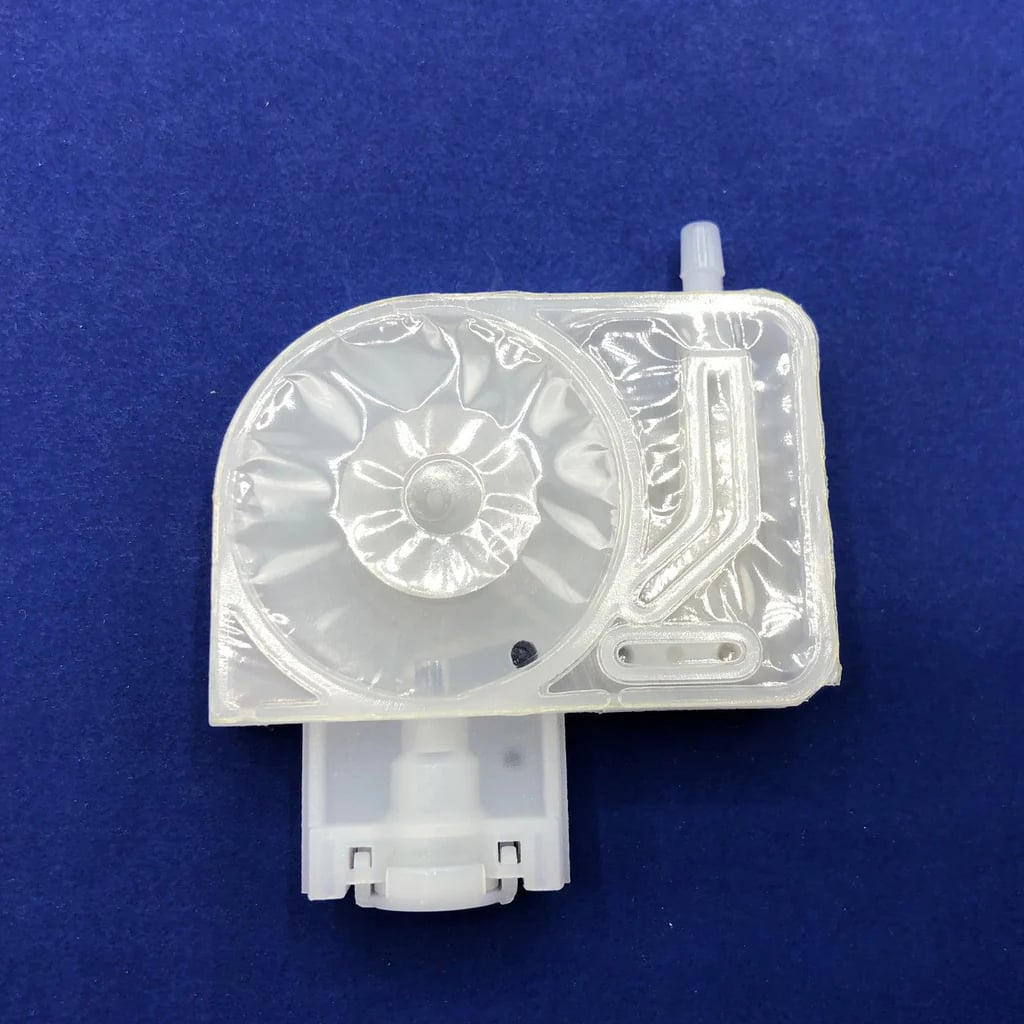
- Remove Old Dampers: Carefully remove the old white ink dampers. If the internal mesh of the damper has accumulated too much sediment, it will cause a severe drop in ink pressure.
- Crucial Step: Pre-filling (Very Important!): When installing new dampers, you must manually prime/fill the new damper with white ink first. If air remains inside the damper, banding will continue to occur no matter how many automated cleanings you run.
- Precision Installation: Reinstall the filled dampers, ensuring they are firmly locked and perfectly sealed. Any tiny air leak will ruin the process.
- System Restart: Power on and perform one (and only one) white normal cleaning cycle.
- Nozzle Check: Run a nozzle check pattern.
Technical References:
The Results:
After following this protocol, the client was thrilled to find that the persistent banding had completely vanished. The white ink base was restored to its original richness and uniformity.

Winnerjet’s Final Conclusion:
Replacing a printhead should be a last resort, not the first choice. By using precision chemical cleaning and switching to high-flow ink, over 80% of “dead” printheads can actually be revived. Through this process, we helped our client save thousands of dollars in repair costs. She ultimately discovered that the key to solving her problem wasn’t an expensive new part, but rather more stable Winnerjet ink and a scientific maintenance routine.