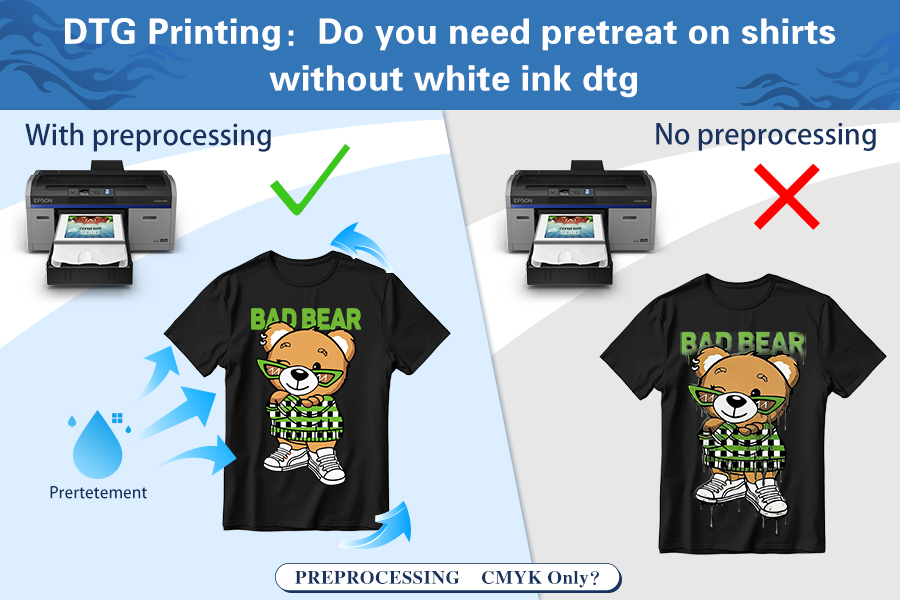
In the daily grind of DTG production, one question constantly puzzles shop owners: “If I’m only printing on light-colored tees and don’t need a white base (CMYK Only), can I skip the pretreatment step?”
Many beginners believe pretreatment is solely a “glue” to make white ink stick to dark fabrics. However, as an ink supplier with nearly 20 years of experience, we need to debunk this myth: In light-colored printing, pretreatment isn’t just glue—it’s a visual enhancer and a color-locking barrier.
I. The Dual Role of Pretreatment in “No White Ink” Printing
NO! You generally do not need to pretreat 100% white cotton shirts if you are printing with DTG without white ink (CMYK only). However, for blended fabrics or to achieve maximum color vibrancy, pretreatment is still recommended. Here is why:lor vibrancy, image sharpness, and wash fastness.
Many printers think pretreatment is only necessary for white ink to provide “grip.” But from the perspective of fluid dynamics and pigment chemistry, pretreatment plays the role of a vital “visual gatekeeper,” even when doing pure CMYK prints on white or light-colored tees.
When you spray digital ink directly onto untreated cotton fibers, the fabric acts like a microscopic “dry sponge,” leading to two fatal technical flaws:
1. Establishing a Physical Barrier: Preventing “Deep Escape” (Anti-Absorption)
DTG ink is essentially pigment suspended in a liquid carrier. Without a pretreatment layer, the moment the ink hits the fabric, it seeps deep into the gaps of the cotton fibers toward the back of the shirt.
The Consequence: Pigment particles that should stay on the surface to reflect light get “buried” deep inside the fibers.
Visual Result: The print looks pale and washed out, as if it’s already been through the laundry dozens of times.
The Fix: Once dried on the surface, pretreatment forms a microscopic chemical film. This film acts as a barrier, forcing the colored ink to stay on the topmost layer of the fabric, ensuring 100% of the color is visible to the eye.
2. Instant Fixation: Inhibiting Bleeding and Loss of Vibrancy (Color Catalyst)
Cotton fibers have a natural “wicking effect,” causing liquids to spread along the fiber lines.
The Consequence: This spread leads to “bleeding” or fuzzy edges, especially on dark text or high-contrast borders. Furthermore, the longer wet ink sits on a fiber, the faster its saturation degrades.
The Fix: Premium pretreatment contains specific electrolytes or catalysts that act like magnets with strong electrical attraction. The moment an ink droplet touches the treated layer, a chemical reaction triggers a “flash-drying effect,” turning the ink from liquid to solid instantly.
This instant-solidification technology locks the ink in place. Not only does it eliminate blurriness, but it also increases the final color vibrancy by 30% – 50% compared to untreated shirts.
“It’s not just about looking good; it’s about locking in your margins.” Without pretreatment, you might be tempted to crank up the Ink Volume in your RIP software to get brighter colors. This creates two new problems: rising costs and excess moisture that causes fabric puckering or ink strike-through. With pretreatment, you get stunning colors while using less ink.
| Feature | Without Pretreatment (CMYK Only) | With Pretreatment (CMYK Only) |
|---|---|---|
| Color Vibrancy | Dull, "Sunk-in" look | Vivid and Bright |
| Print Sharpness | Ink may bleed slightly | Crisp details and edges |
| Wash Fastness | Fades faster after washes | Long-lasting durability |
| Best For | Vintage/Faded style shirts | Retail-quality apparel |
II. Why Do Many Print Shops Want to Skip Pretreatment?
We admit that in certain production scenarios, skipping this step is tempting. There are three main reasons why “printing naked” is attractive:
1. Chasing “The Softest Hand”
For brands targeting the high-end summer apparel or loungewear markets, the “feel” of the shirt is everything.
Technical Advantage: Skipping pretreatment means zero chemical polymer residue on the fabric. The print feels identical to the rest of the shirt, maintaining 100% natural breathability.
Ideal Scenarios: High-thread-count combed cotton, yoga wear, or infant clothing with sensitive skin requirements. This “no-feel” print is a major selling point for premium custom orders.
2. Eliminating the “Yellow Square” (Staining & Heat Press Marks)
Light-colored fabrics (especially white, light blue, or heather gray) can develop faint yellowish rectangular marks after being sprayed and heat-pressed.
Pain Point Solved: While these marks usually disappear after the first wash, they can hurt that crucial first impression upon delivery. Skipping pretreatment allows you to print directly, completely avoiding the risk of fabric discoloration or scorched fibers. Your product looks “cleaner” right out of the box.
3. Maximum Production Efficiency and Cost Optimization
We’ve calculated the cost difference per light-colored T-shirt (based on an industry average estimate for a 500-piece order):
| Cost/Efficiency Metric | With Light Pretreat (Per Unit) | Skipping Pretreat (Per Unit) | Total Savings (500 Units) |
|---|---|---|---|
| Consumables (Liquid) | $0.10 - $0.15 | $0.00 | $50 - $75 |
| Labor Time | ~45-60 seconds | 0 seconds | ~6 - 8 Hours |
| Energy Loss | Secondary Heat Press/Dryer | $0.00 | $15 - $30 |
* Note: Labor savings based on average production speed and operator wages.
Direct Gain: You save approximately $0.20 – $0.35 in total costs per shirt. For high-volume, thin-margin orders, these savings are substantial.
III. The 3 Major Costs of Skipping Pretreat (Risk Warning)
While you save time and money upfront, as a supplier, we must warn you: these “savings” come at the expense of the garment’s commercial lifespan. Laboratory tests show that skipping pretreatment leads to quality failure in three areas:
1. Dull Colors: A “Downgrade” in Visual Impact
Without the intercepting layer of pretreatment, CMYK inks are “diluted” by the fibers.
Weak Blacks: The biggest giveaway is the black ink. On treated fabric, black is deep and rich; on untreated fabric, it looks like a pale Charcoal Gray.
Color Distortion: Reds turn muddy, and yellows lose their brightness. The whole design looks like it has a “gray filter” over it, losing the vibrancy that drives consumer impulse buys.
2. “Fuzzy” Edges: The Loss of Detail
Without pretreatment to instantly freeze the ink droplets, the ink travels along the fiber grain before drying.
The Detail Killer: For designs with small text (under 10pt), fine line art, or high-res photos, the edges become blurry.
Visual Contrast: Treated prints are laser-sharp; untreated prints look like spray paint on a wet newspaper—fuzzy and “hairy.” For clients seeking “photo-realistic” results, this is a deal-breaker.
3. Washfastness Crisis: The Brand Killer
This is the most critical point. Pretreatment isn’t just a brightener; it’s the “chemical bridge” between the ink and the fiber.
Wash Test Results: According to our data, under standard wash conditions (180°C / 30°C water):
With Pretreat: After 20-30 washes, color retention remains above 90%.
Without Pretreat: After just 3-5 washes, the print shows significant “fibrillation” (white fibers poking through) and heavy fading.
Result: The customer might be happy when they receive the shirt, but after two washes, it looks old and worn out. This leads to bad reviews and a total loss of brand trust.
IV. Expert Advice: When to Spray and When to Save?
In the DTG industry, there is no single “right” answer—only the “best business choice.” We recommend following these guidelines based on the end-use of the order:
1. You can confidently “skip it” when:
Chasing a “Vintage & Distressed Look”: If the design is meant to look worn or uses muted colors, skipping pretreat provides a soft, “lived-in” texture where the ink feels like part of the fabric.
100% High-Quality Ring-spun Cotton + Low Budget: High-quality cotton has tighter fibers that control ink spread better. This is perfect for low-cost promotional giveaways intended for single-use events.
2. Pretreatment is your “insurance policy” when:
Retail & Brand Orders (Retail Quality): If the garment is going on a store shelf or produced for a streetwear label, pretreatment is mandatory. That “out-of-the-box” pop is what justifies a premium price.
High-Detail & Photos: Designs with skin tones, gradients, or vibrant color blocks (like bright red or royal purple) require pretreatment to lock the droplets instantly and prevent a muddy mess.
Promising High Durability: If a client asks, “How long will this last?”, and you want to say “Over 20 washes,” you must pretreat. It is the only way to ensure a strong bond between pigment and fiber.
DTG vs DTF Pretreatment: What’s the Difference?
Many users wonder if DTF requires the same liquid pretreatment as DTG. The answer is no.
- DTG Pretreatment: A liquid solution sprayed directly onto the fabric to keep the ink on the surface.
- DTF “Pretreatment”: Pretreatment for dtf? Uses a hot-melt adhesive powder applied to the printed film. If you are looking for high-quality results without the liquid mess of DTG, DTF is a great alternative for both light and dark fabrics.
V. Pro Tips from the Winnerjet Experts
If you want to squeeze maximum performance out of your equipment or find yourself forced to deliver a “no-pretreat” order, master these tricks:
1. Avoid the “Dilution Trap”: The Chemistry of Light Pretreat
Technical Warning: Many users try to dilute dark pretreatment with water for white shirts to save money. This is a “suicide mission” for quality.
Chemical Difference: Dark pretreat has high levels of bonding agents for white ink. When heat-pressed on light fabrics, these chemicals oxidize aggressively, causing irreversible yellowing.
The Solution: Use Winnerjet Light Garment Pretreatment. It is formulated specifically for CMYK vibrancy and high thermal stability, ensuring light fabrics stay true-to-color under the heat press.
2. The RIP Software “Cheat Code” (When not pretreating)
If you skip pretreat for hand-feel, adjust your software to compensate:
Ink Boosting: Increase your color density to 115% – 125% in your RIP software.
Double Strike: Enable bi-directional or double-pass printing. This uses more ink but fills the fiber gaps more effectively for a more “solid” look.
Key Tip: More ink means more moisture. You must extend drying time by 20-30% to prevent the design from being tacky or washing off immediately.
3. “Wet-on-Wet” vs “Wet-on-Dry”
We see a massive difference in success rates between these two workflows:
Wet-on-Wet (Fast but Risky): Spraying and printing immediately without heat-pressing dry. This dilutes the ink droplets and risks “mist” being sucked into the printhead, increasing the risk of clogging.
Wet-on-Dry (Winnerjet Recommended): Spray, then heat-press dry (160°C for ~10-15 seconds) before printing. This flattens the “fuzz” on the fabric and allows ink to land on a smooth, cured chemical layer. Detail sharpness increases by 40%.
4. Fixing the “Heat Press Square”
If you see a press mark after pretreating, don’t panic:
Winnerjet Hack: During the final cure after printing, use high-quality parchment or silicone paper instead of a Teflon sheet and reduce the pressure. If a mark remains, lightly mist the area with distilled water and let it air dry; the mark usually vanishes.
Conclusion: Let Technology Work for Your Bottom Line
Our advice is always: Test first. Take two identical white tees—pretreat one, skip the other. Print the same design, wash them five times, and show them to your client. Let them see the difference and decide if they are willing to pay the extra $$0.20 for quality. In most cases, quality wins the repeat business.
Want a sample of Winnerjet Light Garment Pretreatment or a RIP setup guide for your specific printhead? Contact us today!